Translate

Monday, December 19, 2016

No Ordinary Crayon Box

 Today I have something that shows you
how you can use some printable papers and personalize
a gift for someone or turn something into the way you want it.


I found this adorable little wooden purse shaped trinket box
that I wanted to customize for my granddaughter to put her crayons in.
We couldnt have a plain old box for her, we had to glam it up
and give it some pazazz.

Since these papers are the U-print download, you can print
to the size you need.

from Sherri Baldy My Besties.


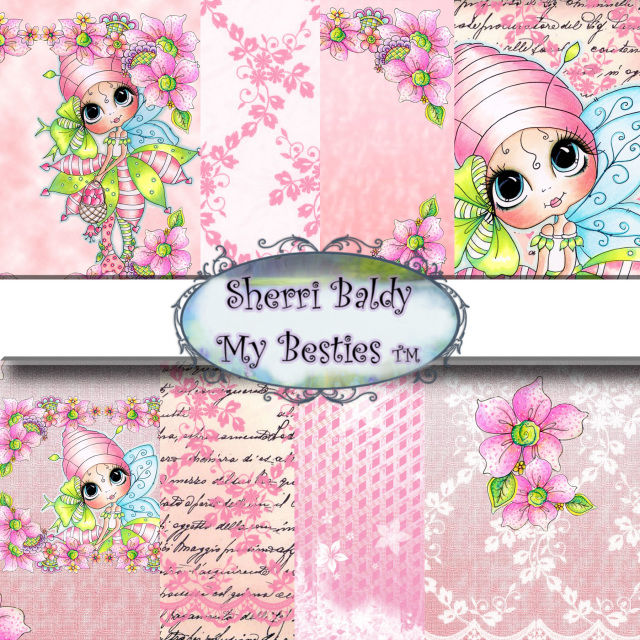
All the papers match beautifully and can be used
in a variety of varations to get the look that is
"just right"


I began by taking the hardware off the box and priming and painting
it all white.  It took 2 coats for a good coverage with a light sanding
after the second coat.

This is where the fun began.  I began placing the papers once printed 
to cover the front and back to see which placement
I liked and with different variations til the 
look that I wanted just popped out.

I painted gesso on the front panel of the box and also
a coating on the back of the paper.   I used a brayer
to go over the paper to make sure all the bubbles
where out and to also make sure I had a great bond.
I set it aside to let it dry completely.  I repeated the same process
for the back panel also.

Once dry, I took a exacto knife and trimmed all the extra paper away.
I took a nail file and gentle filed the edges to remove any little
pieces.

I covered every inch with mod podge to completely seal everything
and added the hardware back on.


Check out all the wonderful paper packs available
and decorate away.
You can find all the printable paper packs HERE


Thank you for joining me and hope to see you again.
Until next time

Happy Crafting

Tuesday, December 13, 2016

Winter Wishes

Hey everyone!

The weather is turning colder and the snow is beginning to fall.
Winter has decided to make a grand entrance with all the white
fluffy stuff and remind me of blues.

Today I have for you a little cutie that is all decked
out in the snow.


This little gem is from Sherri Baldy My Besties


For the background I used distress ink to just give a subtle blue
and then heat embossed a snowflake image all over the panel in gold.


I colored my image and fussy cut her out and using foam dots
to pop her up on the panel.

I used copics to color her

Blues: B00, 91, 93 and 97
Hair: E40, 41, 43, 44 and 47
Skin: E50, 51, 53 and 33

Thank you for having a look.


Happy Crafting


Friday, December 9, 2016

Believe in the Magic of the Season


Hello Besties!  The holiday season has begun and today
I have for you a card made with the traditional colors
of Christmas, red and green.

I enjoy the music, the joy and the magic of the season with
seeing the lights, festive displays and the excitment kids get
this time of year.  It adds so much happiness for a time
of year that can be dreary with the weather.  Any little
bit of "Magic" of the season is a welcome feeling.


I started with a shaped card and wanted to keep the embellishments
to a minimum as I planned on using this greeting embossing folder
and wanted it to show as much as possible in the design.


I stayed with the red and green when coloring up this adorable
image,  img454


For the inside I carried over my little sweetie and added her to the
sentiment card.
I just cropped my image when cutting out the oval to leave
space for the sentiment.


I hope I have added some holiday cheer to your season with this
project.

We would love to see what you make by joining us at


Also, check out all the holiday digis, papers and printables at


Thursday, December 1, 2016

Have yourself a Country Christmas


Winter time is here and time for the holidays!
How do you decorate for the season?
Do you have a theme, colors you use?

This year I decided to have a Country Christmas.
I have burlap, white and lots of natural items
filling my house this year.

I have made a few lanterns to have around the house and have made smallers versions
to hang on my tree instead of string lights.  I have been casing my local
dollar store for battery tea lights for the smaller version and used the battery
small candles for the larger lanterns.


I started with having my base and cap pieces at 5x5 inches
as that is one of the measurements to use my Martha Stewart 
punch set to punch all the edges and corners.


I then decided to have a 4 inch lantern and cut 2 pieces 5in. tall and
8 1/2 in. long.  The extra 1/2" is to have tabs to make your lantern frame.

I used a framelits die to cut out the windows on all the sides.


I made a small box to become a bottom frame to attach the 
lantern panels to.  This small box is 4 in. Sides are 1/2"


I then attached to frame to the punched 5x5 piece


For the second punched 5x5 piece, I attached another 4" small box
to make the top.  This is the foundation and slides into the top of the 
lantern panels.


For the top I started with 4 panels cut to these measurements


Here it is cut out.

You take the 4 panels and attach in this manner

Once you have the four together, you glue the last edges together
and it forms the top


Attach to the top frame base and 5x5 punched piece
and you have your top.


Now just decorate to your liking with colors and embellishements.


I am using a Sherri Baldy My Besties digi image


There are several adorable images for the holidays that you
could use on various projects this holiday season.

You can check them all out at


Happy Crafting


I would like to enter into these challenges for this project:


Saturday, October 29, 2016

Holiday Wishes with Gingerbread Kisses

The Holidays are coming and baking season
for me will be in full swing.

Thinking of baking and all the yummies, today I would
like to share with you the new Gingerbread Papers Mega Kit.


Complete with over 30 adorable papers to create with this season.


I am using a Sherri Baldy My Besties image with these papers.


I carried some more papers to the inside to finish it off.


SURPRISE!!!  It is a panel pop out for more fun.

I colored img815 for the front and scanned it to make smaller 
printable for the inside.


I found this card on pinterest with many different tutorials but
used this one for my finished card
Obsessedwithscrappin has a nice video and Cricut design space file
also with this video.


Saturday, October 15, 2016

All My Ghoulfriends: 3 Tiered Card with tutorial

Hello Everyone!
Today goes out to all my Ghoulfriends!!!!

This time of year we have ghouls, gourds, pumpkins
and cute little witches everywhere.

Halloween to me is all about the fun of colors and
the creativity you can come up with.

I have a triple tier card for you that has a
Sherri Baldy My Besties digi as my cute little
pumpkin sitter.


The image is img734


As you pull the top tab, the layers reveal all inside
for a fun little surprise.


This was made for a friend in mind, so the sentiment had to
be something she would enjoy and have a good laugh at.


So how did I make this little gem.

Let's start with the supplies.

You will need cardstock in the color of your choice for the base.

Cut your cardstock into
1-6"x 12"
1-5"x 11 1/4"
1- 3 1/2" x 4  1/2"


save your scraps as we will be using a piece of it as well.


Score the  6" x 12" with the 12" side at the top at 4" and 8"


Score the 5" x 11 1/4" with the 11 1/4" side at the top at 3 3/4 and 7 1/2"


On the pieces that are scored, you need to add some slits to the
right scored panel on both pieces.
Cut slits 1" in from the score line and another 1" from the outside edge.
I cut my slits 1/2"in from top and bottom.


These slits let your cards slide up and down inside the card.

You need to start with your  3 1/2" x 4  1/2" piece and
your 5"x 11 1/4"

Remember the little scraps I mentioned.  This is where we 
make a strip to weave into the slit.
Follow the picture.


Add tape or glue to each side of the strip.  This is where you will attach 
the next piece.


Take your 3 1/2" x 4 1/2" piece and lay it on top so the top edges
are flush.


We are going to fold the right side in first and then the left over the top.

Add glue or tape down the edges.  My folder and scissors are placed
to show you the edges I did.


Your first tier is finished


Do the same thing to your next piece with adding your strip and placing
the first complete tier onto it.

Make sure your top edges are even.  You may need to adjust things
just a bit.


Fold like you did for the first tier and glue or tape your edges and you 
have completed the tiers


Decorate and add a tag at the top.  You may
 want to add your 
papers first before putting all together.


You can find many more adorable ideas
and projects over at


Why not join us.  This image is one of the images offered as a prize
for this month.
All projects and images are welcome to enter.

Thank you for joining me and having a look.