Translate

Friday, June 9, 2017

Travelers Notebook Insert: Out of This World

Hello Everyone!!!  Today I have for you a small
OUT OF THIS WORLD
notebook for either you to carry in your purse or for me
I have added it to my travelers notebook.


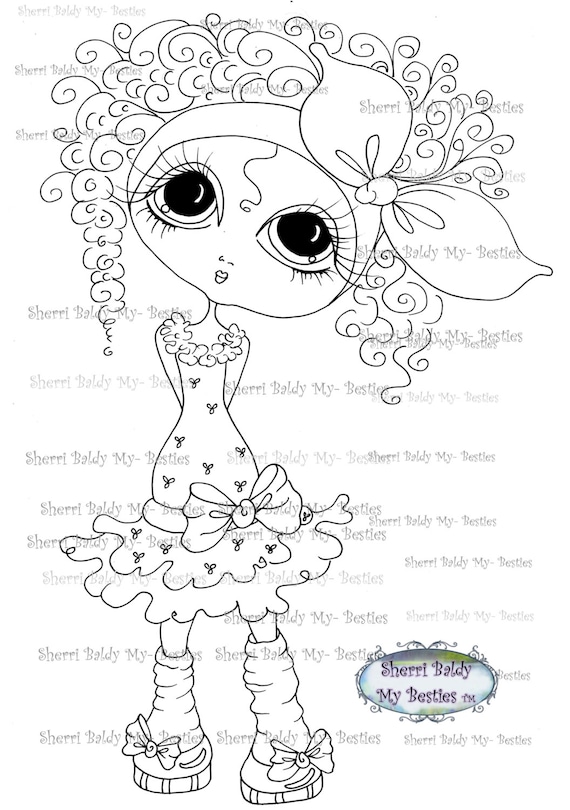
I am using a NEW image from the


The notebook measures 4X6 or size A6 in size and are so easy to make.

For anyone who isn't familiar with travelers notebook inserts, this 
is the way to make a purse notebook for yourself.
Since the finished size is 4X6, I started with the size of
 6" height and 8" width.   I printed my image to the
right side of the width measurement.

To fill the notebook just cut paper to the same size of 6x8 
and fold all in half.

The possibilities are endless as you can use
watercolor paper, heavy cardstock, or even
a printable as your cover.


I have a stapler that is made for center stapling and
just stapled on the fold line and have a instant notebook.

You dont need a center stapler.  You can open your stapler
and have a soft surface and staple but dont push all the way down.
Push the staples the rest of the way through and fold down the
inside parts. 


Are you wanting to learn how to use the colorless Blender?  Are you wanting
to learn new techniques with coloring skin or need some help with it?

Well,  You can join me at the upcoming


Check out all the details.


Check all the NEW and EXCITING things coming
out of the Besties Studio


Until next time!!
Thanks for having a look

Tuesday, May 9, 2017

Tissue Paper and Soap: Great Little Gifts with a twist

Hey everyone!  With Mother's Day right around the corner
alot of memories have floated in and out of mind.

I was already knitting up some washclothes to add
to my stash when one of those old memories popped
into my head and BAM the idea was born and ready
for me to get busy.


What possibly could a bar of soap and tissue paper have to do
with a Besties?


Way back in my elementary school years when you would
make Mother's Day presents as your art class we did a project
with pretty printed napkins and soap.  Cutting up the napkin
and adhering to the soap for our gifts with a little note.

Why not recreate this idea with my own twist.

Taking Besties Printables and printing them onto the tissue paper
and mod podging them to the soap for a sweet little gift.
With tons of cuties to pick from the ideas are endless

Check out all the printables available


So the question is how?  Cut a piece of the tissue paper to fit a piece of paper 
and tape it down and run through your printer.  Easy as that.

Cut around your image.  Doesn't have to be perfect.
Brush on the mod podge to the soap and put your image
down.

You need to brush a layer on top as well.  Make sure to have plenty of 
mod podge on your brush as you want to make one good pass
over the top.  If you try to brush several times, the ink will bleed.
You can add another coat after the first dries to finish it off.


I paired a bar of Besties soap with a handmade washcloth
and tyed with a ribbon for a sweet little gift.


I hope you have enjoyed todays little idea.

Happy crafting


Sunday, April 9, 2017

Mixed Media and Monochromatic

Hey everyone!!

I am excited to share with you a project I made.
I made this a while ago but wanted to show you
all the possibilities and different
ideas you can do with these adorable images
and papers from Sherri Baldy My Besties.


I made a mixed media 5" x 7" canvas with img146 Prim-A-Dona and
Sherri Baldy Designer Paper in Butterfly Dreams.
This was a fun project that I enjoyed doing.  Picking all the bits and pieces
and just playing around.


For this project I have used the following supplies:
5" x 7" canvas
Stencil- Tim Holtz burlap
Distress Inks-various colors
Stampendous Bubble Gum ink pad
Airdry clay
lace
paper roses
various embellishments cut with a Cricut
black enamel small dots

I started with printing my Butterfly Dreams paper on regular thin paper.

I took various ripped pieces and with the gesso applied to the canvas randomly.

Once dry, I took my stencil and texture paste and added randomly to the canvas
and used a heat gun to dry.  You could even place texture paste down and
apply a texture with fabric or any other items you have laying around.

I took the lace and chipboard elements and applied with gesso onto
the canvas.

Let it dry!!!!!

I took distress inks and the bubble gum ink and applied once again
randomly to the canvas .


I added the Frantage embossing enamel to areas on the canvas
and to the various embellishments


I mounted My Besties with foam pop dots and all my embellies with glue dots.


I have provided for you my copic choices for coloring her.
I did her in a monochromatic color tone with pops of pink.


Thanks for having a look!!


For more fun papers and images have a look over at

MyBestiesShop.com


Saturday, April 1, 2017

Hoppy Easter

Hello Besties!  Spring is here!

Today I have for you a fun little 3D card that is easy
to put together and still give you some WOW!


Let's start with all that I used.

I loved the flowers in this paper pack and decided to use it
for a few of my background papers and for my die cut.


I picked my 3d printable


I cut my papers out and die cut my shapes.


My card base is 6 x 6.


With the leftover paper from my flower die cut, I cut out
a few of the flowers to carry over to the inside and left
space to add a personalized message.


There are lots of possibilities to dream up
with all the printable available and paper packs
to mix and match.

Check them all out at


We would love to have you come and share you creations
with us at 
on
Facebook

Happy Crafting

Thursday, February 9, 2017

You Shake My Love

Hello everyone!  I have been absent as the winter blues
got ahold of me and then the yuckys began to come around.
I am back on the mend and getting into the LOVE BUG
moment with Valentine's Day approaching.


Today I have for you a shaker card filled with LOVE.

I am using a downloadable paper pack from
Sherri Baldy My Besties.  This is With All My Heart


This is a fun pack to work with.  The papers match
and offer many different ideas waiting to come to life
with me.  


I filled my pouch that I made with my fuse tool
 (Love it! Easy to make these shakers and pouches)
with paper punched hearts, seed beads and sequins.
I love the mix it gives.

And my new favorite little extra is fun foam sheets!
This stuff is great for popping up the top panel on the
pouch.  I have a new love for these as I have
over looked them for sooooo long.

Thanks for coming by and having a look.

You also should check out all the other
downloadable paper packs available
from Sherri Baldy My Besties.
You can find them HERE.

Cant print.  No problem.  There is also printed packs available
See the selections HERE.


Happy crafting everyone.


Friday, February 3, 2017

Make it With Attitude

Hello Everyone!

Ever have a project that needs just a small amount of 
ATTITUDE.

I have for you today the perfect combination of
cute and attitude.


Today I am using 2 different paper packs that has the
ability for sweet and sassy all mixed up in one.

I am using 
from Sherri Baldy My Besties


I am making some shaker bookmarks.


All you need to do is print whichever paper you would like to
work with and cut to size.  These I have made into 2 1/2 wide and 6 1/2 tall.
I stamped my sassy sentiments.  I am using a stamp set
from Dylusions.


I grabbed a page projecter and my fuse tool and made
the sleeves for the bookmark and added sequins and sealed it up.
For my tassels I grabbed novelity yarns from my yarn stash
and just tied them on.

As my kids get older, I am finding it hard to find little fillers for a
a small Valentine gift.  Along with some candy and gum, these will
be added for them into a small gift package.

Hope you have enjoyed todays little make and hope
I have inspired you to make some attitude!

Happy crafting


Monday, December 19, 2016

No Ordinary Crayon Box

 Today I have something that shows you
how you can use some printable papers and personalize
a gift for someone or turn something into the way you want it.


I found this adorable little wooden purse shaped trinket box
that I wanted to customize for my granddaughter to put her crayons in.
We couldnt have a plain old box for her, we had to glam it up
and give it some pazazz.

Since these papers are the U-print download, you can print
to the size you need.

from Sherri Baldy My Besties.


All the papers match beautifully and can be used
in a variety of varations to get the look that is
"just right"


I began by taking the hardware off the box and priming and painting
it all white.  It took 2 coats for a good coverage with a light sanding
after the second coat.

This is where the fun began.  I began placing the papers once printed 
to cover the front and back to see which placement
I liked and with different variations til the 
look that I wanted just popped out.

I painted gesso on the front panel of the box and also
a coating on the back of the paper.   I used a brayer
to go over the paper to make sure all the bubbles
where out and to also make sure I had a great bond.
I set it aside to let it dry completely.  I repeated the same process
for the back panel also.

Once dry, I took a exacto knife and trimmed all the extra paper away.
I took a nail file and gentle filed the edges to remove any little
pieces.

I covered every inch with mod podge to completely seal everything
and added the hardware back on.


Check out all the wonderful paper packs available
and decorate away.
You can find all the printable paper packs HERE


Thank you for joining me and hope to see you again.
Until next time

Happy Crafting